
How to Use the Disk Cleanup Utility on Windows 11
Windows 11 offers various tools to enhance system performance, and the Disk Cleanup Utility is one of the most effective resources for managing storage. If you’re experiencing slow operations or are running low on disk space, utilizing the Disk Cleanup Utility can significantly help.
Accessing Disk Cleanup: Multiple Methods
Method 1: From Windows Search
To begin cleaning up your storage:
- Open Windows Search: Click on the Start menu or press the Windows key on your keyboard.
- Type Disk Cleanup: In the search bar, input “Disk Cleanup” and select the application from the search results.
- Select the Drive: You will be prompted to choose a drive. Typically, you’ll want to select the C: Drive.
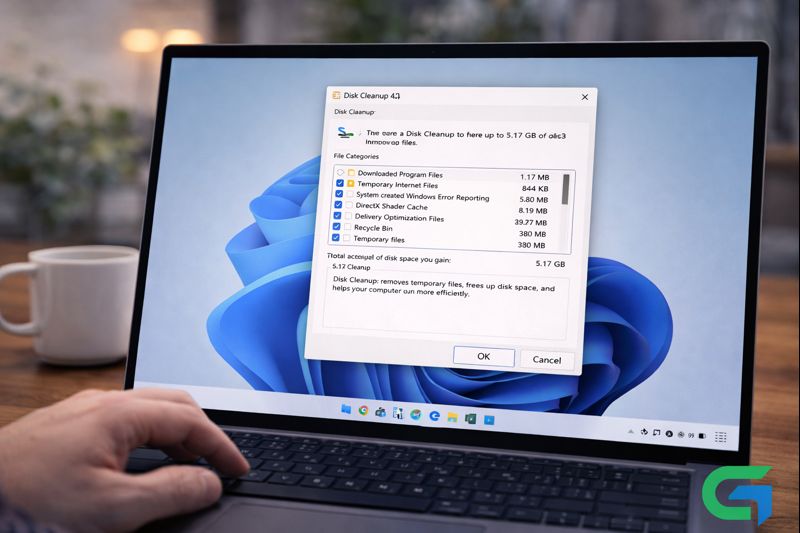
- View Deletable Files: After clicking OK, a list of files available for deletion will appear.
- Choose Files to Remove: Scroll through the list and select the files you wish to delete. As you make selections, you’ll see the total space you can reclaim.
- Confirm Deletion: Once you’ve selected the files, click OK, and confirm by selecting “Delete Files” in the prompt.
Method 2: Using Windows RUN
For users who prefer keyboard shortcuts, running Disk Cleanup via the RUN dialog is straightforward:
- Open RUN Command: Press Windows Key + R simultaneously.
- Execute Command: Type
cleanmgrand hit Enter. This action will launch the Disk Cleanup utility directly. - Follow the Cleanup Steps: Proceed with the same steps as mentioned above to remove unwanted files.
Method 3: Through Control Panel
If you encounter difficulties accessing other methods, the Control Panel can be an alternative route:
- Open Control Panel: Search for and select Control Panel from the Start menu.
- Navigate to Windows Tools: Click on the “Windows Tools” option.
- Double Click Disk Cleanup: Locate the Disk Cleanup icon and double-click to open it.
Automating Cleanup with Storage Sense
Windows 11 also features Storage Sense, which can be set to run Disk Cleanup automatically:
- Access Settings: Click on the Start button and select “Settings.”
- Select System and Storage: From the System settings, click on “Storage.”
- Enable Storage Sense: Locate and enable the Storage Sense feature.
- Configure Cleanup Options: Adjust the settings under “Cleanup of Temporary files” to specify how often Storage Sense should run.
- Run Storage Sense Now: After configuring, scroll down and click “Run Storage Sense Now” to initiate the cleanup immediately if desired.
Read also : Disable Windows Defender SmartScreen on Windows 11: A Guide
Conclusion
Using the Disk Cleanup Utility on Windows 11 is an essential step in maintaining your system’s performance and storage space. By following the outlined methods, you can easily free up valuable disk space and ensure your computer runs efficiently. Regularly utilizing this tool will help keep your system clutter-free and optimized.
FAQ
How to clean junk files on Windows 11?
To clean junk files, run the Disk Cleanup utility by following the detailed steps mentioned above to remove temporary files and other non-essential data.
Is there any third-party tool to clean junk files?
Yes, various PC optimization software, such as CCleaner and BeachBit, is available to locate and remove junk files, improving system performance.
What is taking up space on my Windows 11 hard drive?
Typically, large applications and games consume substantial storage. To pinpoint what’s using your disk space, navigate to Settings > System > Storage.
Disk Cleanup Windows 11 command?
You can access the Disk Cleanup utility through the command prompt by running cleanmgr from an elevated Command Prompt.
Windows 11 Disk Cleanup is missing. What should I do?
If the Disk Cleanup utility is missing, check for corrupted system files using the SFC command, or consider resetting your Windows 11 PC to restore functionality.
Can I schedule Disk Cleanup on Windows 11?
You can configure Storage Sense to automate Disk Cleanup, allowing it to run periodically without manual intervention.
Is Disk Cleanup safe to use?
Yes, Disk Cleanup is a safe tool provided by Windows, designed to help users maintain optimal performance by freeing up space by removing unnecessary files.